Before even beginning, I have to give credit to some folks without which this would not be possible. First, to “Uncle” Doug Van Bossuyt. Not only has he freely provided unlimited information concerning the workings of our bikes, but his thoughts and passion concerning our PC800s was the final nail that sealed my decision with which bike to purchase. His site is here: http://www.douglasvanbossuyt.com/2012/04/16/pc800-full-led-conversion/
Also have to acknowledge the international groups of PC800 owners that have answered so many of my questions.
http://groups.yahoo.com/neo/groups/ipcrc/info
http://pc800.freeforums.org
And now to the meat of it all…
Converting to All LED lights
Step 1. Convert the flasher unit
Your old bulbs work on a simple principle. You flip on the turn switch, power flowing through the flasher is channeled to the bulb filaments, heating them and making them glow off and on. Since LED lights don’t require as much power, the same heating process causes the original flasher unit to think the bulb is blown, thus the fast flashing.
So first, gotta modernize the flasher unit. A newer digital flasher unit that doesn’t depend on the amount of juice flowing through it.
Flasher Unit – $12.99
http://shop.advanceautoparts.com/webapp/wcs/stores/servlet/product_electronic-turn-signal-flasher-tridon-(novita-tech-inc)_5081327-p?navigationPath=L1*14920%7CL2*15004
It will need to plug into a connector that will allow you to wire it to the original wiring from the PC800. Your currently headlight bulb style plug will actually work with this new flasher.
Flasher Plug – $2.99
http://shop.advanceautoparts.com/webapp/wcs/stores/servlet/product_electrical-sockets–3-wire-terminal-seal-beam-lamp-4002-&-4005-bulb-dorman–conduct-tite_5011965-p?searchTerm=headlight+socket#
The Tridon EP 34 plugs into a standard headlight socket and you will need a way to connect it to the original harness. I couldn’t find one at the auto parts places, but found 2 sources online.
http://www.ebay.com/itm/Motorcycle-Hitachi-Black-3-Way-Block-Connector-/111221177057?pt=UK_Motorcycle_Parts_13&hash=item19e54c7ae1
This second source is from superbrightleds.com which is where the LED light bulbs were ordered from. The only problem is that the bike’s flasher is a 3 wire unit and this unit from superbrightleds is a 2 wire unit. All I needed was the harness, so I cut the flasher from the connector and added a 3rd wire soldered onto a tiny strip of copper, so it would plug into the original connector on the bike.
https://www.superbrightleds.com/moreinfo/led-vehicle-replacement-bulbs/lf1-s-flat-universal-motorcycle-electronic-flasher/787/842/
There are 3 markings on the flasher unit. E / L / B
There are 3 wires from the connector on the bike. Blue / Gray / Brown-Black
The wiring match as follows:
Blue = E
Gray = L
Brn/Blk = B
The hardest part of this whole fiasco is locating the flasher unit. As you are sitting on the bike, the flasher unit is attached to the frame on the left side where the mirror wiring goes through the frame to the mirror. So you have to remove the windshield and dash access panel.
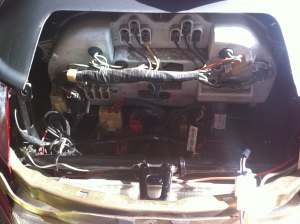
The flasher unit is on the right attached to the outside of the frame. It is attached to a rubber grommet that you have to slide towards the back of the bike, then it will slip right off and you can now access it.
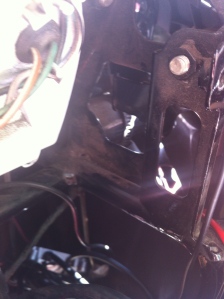
OK, exactly where? You see the silver bolt? Look to the 7:00 position where that open gap is. That is where the grommet is attached. You slide it off and pull it back through to this side of the frame. Make sense?
After the new flasher unit is attached to the wiring, I simply zip-tied it to the frame to keep it out of the way of my HID headlight wiring mess. The flasher unit is now wired in and much easier to remove should it ever go bad.
Step 2. Switch from halogen bulbs to LED bulbs
And now, the bulbs…
Headlight – The HID headlight kit came from ebay. There are tons of kits and tons of colors you can select from. Simply do a search on Bi Xenon HID H4 Slim Kit. I personally use 10K bulbs cause I like the intense blue. There are many makers of many kits, gotta do your own homework for a personal fav. I will say that when ordering a kit, go ahead and get a Slim Kit with 2 bulbs, 2 ballast and 2 sets of wiring. It makes no sense to pay $30 for a single light kit when you can pay $40 and get a double light kit. Then you will always have a spare.
Front Turn Signals – $17.95 per bulb (2 bulbs needed)
The front light is your typical 1157 bulb. It uses 2 sets of lights, one for running lights and the
other for the turn signal. It is also a medium intensity. https://www.superbrightleds.com/moreinfo/tail-brake-turn/1157-led-bulb-dual-intensity-18-smd-led-tower/811/723/
Brake Lights – $19.95 per bulb (2 bulbs needed)
This bulb is also 1157, but the LED version is high intensity to ensure good brake lighting, thus the extra cost. https://www.superbrightleds.com/moreinfo/tail-brake-turn/1157-can-bus-led-bulb-dual-intensity-26-smd-led-tower/1166/2985/
Rear Turn Signals – $19.95 per bulb (2 needed)
This is a typical 1156 bulb, signal filament because it is only on with the turn signal.
https://www.superbrightleds.com/moreinfo/tail-brake-turn/1156-can-bus-led-bulb–dual-intensity-26-smd-led-tower/1326/3051/
License Plate Bulb – $5.95 (1 needed)
If you’re gonna convert, do it all the way, right? The license plate bulb is a wedge type.
https://www.superbrightleds.com/moreinfo/miniature-wedge-base/194-led-bulb-5-smd-led-wide-angle-wedge-base/206/919/
The beauty is, you don’t have to convert everything at once. With the digital flasher unit, you can switch the bulbs out as your bank account allows.
Dash Lights – $4.95 (6 bulbs used)
And while we’re at it, if you want to switch out the dashboard lights, they are here.
https://www.superbrightleds.com/moreinfo/miniature-wedge-base/194-led-bulb-1-smd-led-wedge-base/204/908/
Now, a side note about the dash lights. They are bright. So bright that I found it to be a little distracting for the indicator lights in the middle. Particularly, the Hi Beam indicator distracts my vision, so I switched it back. However, turn signals, oil, side stand are all changed. The awesome part is the speedometer and tach are now blue. Temperature and fuel level are also blue. It’s an awesome look.
Now, how do they function? Well, I suck a bunch of juice out of my electrical system for the sake of looking cool. With the original setup, while in motion, I’m showing around 12.5 – 13v on the display. Sitting at a red light, I dip down to about 11.9. If the blinker is on and the brake light is on, I can dip dangerously low to about 10.9.
With the new LEDs, sitting at an idle with brake light on, blinker flashing, all LED accent lights lit, I’m at around 13.5. When in motion, I’m constantly in the 14v range. So yes, the LEDs will make a difference.
And if you’re curious about the LED strips I use, I have always used 1 seller on ebay. http://www.ebay.com/itm/Universal-194-168-158-921-T10-T15-14-21-SMD-5050-Led-Strip-Magenta-Purple-2pcs-/171047761482?pt=Motors_Car_Truck_Parts_Accessories&vxp=mtr&hash=item27d33db64a


